
Sunday, November 4, 2007
Sunday, 11/04/2007 - Spongebob Monopoly with my Daughter
I'm not a big fan of Monopoly but I do like Spongebob and my 6yr-old likes Monopoly so after church my wife, son, daughter, and I played her copy of Spongebob Squarepants Monopoly. The one thing I like about Monopoly is it teaches the kids math skills. We make our 6yr-old do the math and she is getting pretty good at it. I seen that they have a version that does the math for you - a bad idea in my opinion. I think these electronic games are doing too much for the kids these days.
Saturday, Nov 3rd, 2007 - Finally Some Face-to-Face Gaming
I had not played a face-to-face game since the end of September so was glad I could make it this weekend. Mark Bausman hosted the gaming on Saturday. We started off with a 5-player game of Age of Empires III attended by Mark Bausman, Al Hay, Mervyn Dejecacion, Mark Woodson, and myself. When we got there Mark B announced that the winner would take home a copy of Crusader Rex. In the end it was my early colonization strategy vs Mervyn's Trade Good/Privateer/Building strategy. I barely beat Mervyn by two points. I've only played this game three times but it has become one of my favorite non-wargames.
Al and Mark W. had to leave after the AoE III game so Mark B, Mervyn, and I played Ivanhoe. I took an early lead winning the first four tournaments needing only the jousting tourney for the win but I didn't have the cards to continue so watched Mark B and Mervyn beat on each other as I rebuilt my hand. Meryvn and Mark won a tourney a piece and I then managed to sneak in and take the jousting tourney for the win.
Finally Mark B and I finished off with a game of Starship Catan. It took longer than I thought it would, having never played it before, but I managed to win this one too.
Lady Luck smiled on me this weekend with the wins but the chance to play with the group was the best part.
I'm Proud of my Wife
Last Sunday my wife completed the 60 mile, 3-day, walk for breast cancer. 16 of her 20 team members took part in the walk and it was very emotional at the closing ceremonies with my two daughters telling their mother they were proud of her.
Tuesday, October 16, 2007
Susan G. Komen Breast Cancer 3-Day Walk
My wife, Dana, has been working on her goal of doing the 3-Day Breast cancer walk on 10/26 to 10/28. If you think this is a worth while goal consider making a donation.
Thank you,
John Boone
I will be walking in the 3-Day Breast cancer walk this Oct. This has been something that I have wanted to do since last year. I have been in prayer about this and decided to take this journey.So, I am asking my family and friends to help me out through prayer & donation. I will walk a total of 60 miles; 20 miles per day. I have already started my training and I am feeling good about it.So, join me in this journey with your prayers and donation. I know we can
make a difference in someones life.
Love to all.......Dana
Follow This Link to visit my personal web page and help me in my efforts to support The Breast Cancer 3-Day
***************************************************************************
Some email systems do not support the use of links and therefore this link
may not appear to work. If so, copy and paste the following into your browser:
http://www.the3day.org/dallas07/danaboone?faf=1&e=1152871760
***************************************************************************
Dana Boone
Thank you,
John Boone
Sunday, September 30, 2007
Saturday Sept 29, 2007 Saganami and Twilight Struggle
I went over to Joseph Acker's house and played a three player game of Sagnami Island Tactical Simulator. Joseph and I each took a People's Republic (Peeps) heavy cruiser against two Silesian Confederacy heavy cruisers commanded by Joseph's son, Benjamin. We rolled for crew ratings. My ship had an average crew all around, Joseph had a poor crew, and both of Benjamin's CAs had an Elite Electronic Warfare Officer giving them a +2 ECM modifier. This would make our already less capable missiles less chance of penetrating the Silesian cruiser's missile defenses.
Both sides started with their respective cruisers in the same hex on opposite sides of the map with vectors in the general direction of the opposing forces. Benjamin decided to start +20 levels above the map plane. Benjamin did not want to allow the Peeps to get into energy weapon range, which we never did. The Peeps spent the whole game climbing to get to the same level as the Silesian. The Silesians had the better missiles and it showed as Benjamins first few salvoes pounded on his dad's cruiser eventually causing him to rotate his ship to present his "wedge" to the Silesians. Benjamin then switched his attack to my cruiser heavily damaging my starboard sidewall and taking out 8 missile salvoes on my starboard side missile magazine. Fortunately for me I rolled well with my damage control parties and managed to fix all my magazines and two of three sidewall hits. At this time the Peep missile attacks were practically ineffective only penetrating a couple of times for relatively minor damage.
As the range continued to close it appeared the Silesians were going to be able to pound the Peeps with its missiles but then Benjamin made an error. At the end of one turn he had presented his bow toward our broadsides. Because of the range this would allow us to fire twice at his open bow which we did concentrating all missile salvoes for two consecutive attacks on one of his cruisers. The CA blew up during the second salvo and the remaining Silesian CA surrendered.
Joseph and I then played a game of Twilight Struggle. We randomly chose sides and I ended up playing the US against Joseph's USSR. It seemed to be going OK the Russian's had the lead in VPs but they always get a lead in the early game but it seemed manageable. Then turn 4 started and Joseph's Soviets steamrolled over the US. I had to score Europe (-5VPs) then he scored SE Asia (-7VPs) and a couple more VPs from events gave him the -20VPs for a USSR Auto-Victory.
Wednesday, September 26, 2007
Quick Post
On Sept 7 and 8 I attended the Dallas Games Marathon.
Friday evening, 7th, I played War of the Ring with the expansion with Alan Richbourg. After a 5+ hour struggle Alan's Fellowship managed to dunk the One Ring in the fires of Mt Doom for the victory. Frodo ended up with less corruption, 5, than he started with, 8, as I managed to pull out all four of the Fellowship tiles in four consecutive draws! The Shadow ended with 7 victory points when the ring was destroyed.
Saturday afternoon, Joseph Acker taught me Saganami Island Tactical Simulator. The game is based on the Honor Harrington universe created by the author David Weber. By the way he is also one of the designers of the Star Fire game.
This past Saturday, 9/22, Nevin came over and we played two scenarios from his latest game acquisition, Last Night On Earth. In the first scenario, Die Zombies Die!, it was Cody and I each playing two townsfolk against Nevin's zombie horde. We had 16? turns to kill 15 zombies otherwise the zombies won. It was not looking good for the townsfolk but the Sheriff Anderson went wild with the meat cleaver near the end and then Billy finished off the final zombie with the shotgun for the win on the last turn.
In the next scenario I took the zombies and Cody and Nevin had to defend the manor house. This time the zombies won by getting nine zombies into the manor. This is a quick fun little game.
Monday, September 3, 2007
Empire of the Sun - Cyberboard
Mark Simonitch and I are on Turn 5 of our Empire of the Sun Cyberboard game. Mark just finished his round 4 card play shifting some ground, naval, and air forces closer to the Dutch East Indies. I've landed on Bandjermasin, Borneo and need three more landings to satisfy my Progress of War this turn.
Mark has 5 Japanese armies in Borneo. All my Allied forces can do is stall them if he decides to go on the offensive up there.
Mark has 5 Japanese armies in Borneo. All my Allied forces can do is stall them if he decides to go on the offensive up there.
 Turn 5 Japanese Round 4 Finished
Twilight Struggle - John (US) vs Brian Marrs (USSR)
After our Shifting Sands cyberboard game concluded Brian and I decided to give Twilight Struggle a go using the Vassal module for it. The Vassal module is a beautiful piece of work by Tim McCarron but be advised it requires a good PC to run it. I'm using a 733 MHz PC with 512 MB and it is very sluggish. Additionally the current version will not work with the current version 3 of the VASSAL engine. I was using VASSAL version 2.9 something.
Brian opened up the can of whup arse on me on turn 2 adding 16 VPs to his total ending the turn with the VP track at 18 USSR VPs. On the turn 3 Headline Phase a favorable Indo-Pakistani War gave the Soviets the final two VPs required for a Soviet Auto-Victory. All three Early War Scoring cards showed up in turn 2, Brian held the Middle East Scoring card and I held, too long it seemed, the Europe and Asia Scoring cards.
Brian opened up the can of whup arse on me on turn 2 adding 16 VPs to his total ending the turn with the VP track at 18 USSR VPs. On the turn 3 Headline Phase a favorable Indo-Pakistani War gave the Soviets the final two VPs required for a Soviet Auto-Victory. All three Early War Scoring cards showed up in turn 2, Brian held the Middle East Scoring card and I held, too long it seemed, the Europe and Asia Scoring cards.
 Soviet Auto-Victory, Headline Phase Turn 3!
Nice game Brian.
After the slaughter, Brian and I switched sides and started a new game. This time we are using the Cyberboard gamebox instead of the Vassal module. Much easier on the old PC.
Sunday, September 2, 2007
Nexus Ops
Nevin came over on Saturday, 8/25/07 and we played a 3-player game of Nexus Ops by Avalon Hill. The players represent corporations competing for control and thus the Rubium ore discovered on an un-named moon in some remote un-named planetary system. The corporations were played by the following players.
Cody Boone - Black Helix Enterprises (Blue) = 12 VP John Boone - Zyborg Technologies (Green) = 11 VP
 Nevin Ball - Galactic Syndicate (Red) = 7 VP

Cody won the game at 12 VPs scoring his last two VPs needed squeaking by his dad.
The Object of the game is to be the first player to attain 12 victory points. As soon as one player reaches 12 victory points during their turn the game is over.
For those not familiar with the game, there is no difference between the different player sides other than the name and color of playing pieces. All sides can build the same type of units during the game. This was the first time Cody and I played the game but it seemed like it would be more interesting if the different corporations had a special ability ala Twilight Imperium. None the less it was a fun game.
We rolled for sides and I came up as first player. The first player starts with 12 Rubium to begin the game and each subsequent player gets 3 more Rubium than the preceding player so Nevin was second with 15 Rubium and Cody was third with 18 Rubium.
Cody Boone - Black Helix Enterprises (Blue) = 12 VP
 John Boone - Zyborg Technologies (Green) = 11 VP
 Nevin Ball - Galactic Syndicate (Red) = 7 VP
Cody won the game at 12 VPs scoring his last two VPs needed squeaking by his dad.
The Object of the game is to be the first player to attain 12 victory points. As soon as one player reaches 12 victory points during their turn the game is over.
For those not familiar with the game, there is no difference between the different player sides other than the name and color of playing pieces. All sides can build the same type of units during the game. This was the first time Cody and I played the game but it seemed like it would be more interesting if the different corporations had a special ability ala Twilight Imperium. None the less it was a fun game.
We rolled for sides and I came up as first player. The first player starts with 12 Rubium to begin the game and each subsequent player gets 3 more Rubium than the preceding player so Nevin was second with 15 Rubium and Cody was third with 18 Rubium.
 Nevin Contemplates His First Unit Purchases
Turns are not simultaneous; each player completes the steps of the turn sequence and then the next player takes his turn. The steps of a turn consists of a number of phases conducted in the following order; 1) purchasing new units, 2) move units, 3) conduct attacks, 4) collect income, and 5) draw a secret mission card (if you control the Monolith draw two Energize cards.

An Evil Plan Formulates!
Purchase New Units
During this phase, the the active player purchases new units paying for them with the Rubium they have collected from their mines or due to non-played discarded Energize and Secret Mission cards. Purchased units are placed in any of the players three home spaces. You can place units in your home spaces even if they are occupied by enemy units.
Note: You may discard Energize and Secret Mission cards from your hand anytime during your turn to gain 1 Rubium per discarded card. Discarded cards go face up next to the appropriate deck.
Move Units
After all newly purchased units have been deployed, the active player may move any of their units on the board at least 1 space. I say at least one space because some units have special abilities which increase their movement allowance and certain Energize cards increase the movement allowance of a specific creature type.
1. The Rock Strider can move two spaces if one of the spaces moved to or from is a rock plain.
2. The Lava Leaper can move two spaces when moving from a Lava Pool.
3. The Rubium Dragon, when starting from the Monolith, may move to any space on the map.
If a unit starts in a contested space, the unit may only move into a non-contested space. This move is called a Retreat. Additionally some spaces are off-limits to some unit types. For example, humans, fungoids, and crystalline units may not enter the monolith space.
Conduct Attacks
After moving all of your units you wish, any of your units in a space with an opponent's unit must conduct an attack. Similar to Axis and Allies, each unit has a hit number that must be rolled, on 1D6, to cause 1 hit. And like Axis and Allies, units attack in a specific order so it is possible that a unit is taken as a casualty before it has had the chance to fire. Within the same class, all units attacking and defending fire simultaneously. Losses are chosen by the owner of the unit hit, unless the hit was scored by a Lava Leaper with a die roll of 5 or greater. After all units have fired and losses taken, if both sides still have units occupying the space it is considered contested. If only one side remains in the hex it is considered owned by that side. Note that some Energize cards can be played during this phase. In fact, even players not involved in the battle may play Energize cards to help out one side or the other. The loser of the battle draws an Energize card as compensation for their loss. Some units have enhanced or degraded combat abilities depending on the terrain they occupy.
Collect Mine Income
Once all battles have been resolved the phasing player collects Rubium from all his mines that 1) are occupied by one of his humans, fungoids, or crystalline units and 2) that mine is not contested. Each mine will produce from 1 to 3 Rubium. Note that only the three weakest units can operate the mines to collect Rubium.
Draw Cards
After collecting your mine income the phasing player draws one Secret Mission card. Additionally if the phasing player has sole control of the monolith they also draw two Energize cards. This ends the phasing player's turn and the next player then takes their turn.
Energize Cards
Energize cards give the side playing them special abilities, that may break the normal rules when played, last for a specific amount of time either during your player turn or a battle, or award an instant effect, ie. "Destroy 1 Fungoid". Energize cards are divided up in to two types, ones that are played at the beginning of your turn and ones played during a battle. Of the ones played for battle some are required to be played at the beginning of a battle and some may be played during the battle after seeing the result of a die roll.
 The Game Gets Interesting
How to Win
As stated previously, the first player to reach 12 victory points ends the game and is declared the winner. Victory points are awarded by play of Mission or Special Mission cards during the player's turn whenever they satisfy the conditions of the card. Mission and Secret Mission cards can only be played during your turn so if you satisfy a condition of a Secret Mission card during someone else's turn your out of luck. All Mission cards and most Secret Mission cards involve winning a battle. For each battle you win, you can play only one card with the victory point total listed in red.
The game also ends when one player is eliminated, ie. losses all of their units on the map. As soon as this happens the winner is declared from the remaining players with the most victory points.
All Mission Cards have their victory point total listed in red, are worth 1 victory point, and all are awarded by winning a battle.
The majority of Secret Mission cards are awarded during battle, but not all. Some require dominating, having more control, a terrain type, ie Rock Plains. These type of Secret Mission cards have their victory point total in white.
A fun game I would play again.
Tuesday, August 21, 2007
Jeff Kuhn's War of the Ring Cyberboard Gamebox
I "met" Jeff Kuhn through his posts on the ConsimWorld website and Boardgamegeek. A little over a year ago I had the chance to play a game of War of the Ring with him using the Cyberboard gamebox he had created for the game. His gamebox, graphically, looked quite a bit better than the one I had previously found and was very pleased with his work.
 After we finished our game, he won, we discussed what changes he could make to the gamebox to improve it. Version 5 was completed with larger pieces that were more easily distinguishable but Jeff was still looking for ways to improve the map at the time.
 Jeff recently sent me his latest, version 6, gamebox incorporating the expansion and a newer map graphic.
He will soon be releasing it to the public, after removing the card text, and hopefully it could be used in the upcoming War of the Ring Tournament being talked up on Boardgamegeek here.
I've attached more pictures. Click on them to enlarge.
The Card Track
The Fellowship
The Hunt Tiles
Rivendell
The DEW Line
Orthanc and Rohan
I'm not sure if I will be in the tourney as I'm involved with other PBEM games now but if anyone wants to do a casual game using the gamebox drop me a line.
John
Sunday, August 19, 2007
North Texas Wargamers Gameday - August 18th, 2007
Another good turn out for the North Texas Wargamers gameday this Saturday. There were thirteen people with about 7 different games played.
First Round of Games
1. Blue vs Gray (GMT Games)
 Brian Marrs and Steven Sheasby played a card based game on the American Civil War by GMT Games, Blue vs. Gray. They were still playing it when everyone else left. Not sure if that was one game or multiple plays. Brian Mars gave a description of how both of their games went which I've quoted below.
2. Duel in the Dark (Z-Man Games)
First Round of Games
1. Blue vs Gray (GMT Games)
 Brian Marrs and Steven Sheasby played a card based game on the American Civil War by GMT Games, Blue vs. Gray. They were still playing it when everyone else left. Not sure if that was one game or multiple plays. Brian Mars gave a description of how both of their games went which I've quoted below.
Steven and I played two games of Blue vs. Gray. I took the CSA in the first game and managed to grab enough northern cities in the west to end the game early (British recognition of the Confederacy).
We switched sides for the second game and it took awhile to get the northern steam roller going. But once I had built up my armies I marched down the Mississippi and also grabbed Atlanta. Steven was almost ready to give up at that point, but decided to stick it out for another turn or two to see what happened.
He built up a pretty good sized army of his own in the west, and with a couple of good die rolls, kicked me out of Atlanta and bloodied my army pretty severely. By this time, the 1864 elections were getting very close and I needed to have 4 VP's to keep Lincoln in office. I had 1 VP for a full blockade, 1 VP for cutting off the Mississippi, and 1 VP for controlling the Shennandoah valley, so I just needed one more VP.
The Western army under Sherman was too far away from Atlanta and facing a rather large army under Hood. I had just put Grant in command of rather sizable Eastern army and was facing a somewhat depleted army under Lee, so the time had come to attack Richmond, which would give me my fourth VP.
Steven played "The Slows" card on me which reduced Grant's initiative from 2 to 1. This meant that Lee would win if the battle result was a "General's Battle". The dice were rolled and sure enough, Lee won the battle (I think it was a 1/3 chance of losing the battle outright or to a General's Battle). The 1864 elections put the Peace Democrats in power and the game ended.
It was a good, close game, and I find that I like the game more each time I play it.
2. Duel in the Dark (Z-Man Games)
 Chris Trimmer and Brett Orr played Duel in the Dark. It is a new game by Z-Man games depicting the British night time bombing raids over Germany in World War II. A light wargame with Eurogame components. It looked interesting.
3. Age of Empires III: Age of Discovery (Tropical Games)
 I played a 5-player game of Age of Empires III along with Mervyn Dejecacion, Mark Bausman, Mark Simonitch, and Mark Woodson. This was my second time playing this one and I enjoyed it again. Mervyn ended up schooling us all with a commanding first place finish at the end followed by Mark Woodson who made a large leap from the back of the pack in the final round. I finished third with Mark Simonitch and Mark Bausman taking 4th and 5th place.

I had intended to pursue a military strategy in the New World hoping to pick up at least one of the soldier producing buildings. Un-fortunately Mark Woodson managed to pick up both of them during the course of the game. He became the building, money leader, and a five-ship Privateer building owner. I expected him to jump out to first place during the final game scoring but I purchased the Navy building in the last turn stealing 20 VPs from him. I still stayed with my soldier strategy but had to acquire them on the Specialist track. After the Second Age scoring Mervyn was at 30 VP (Missionary Strategy), I was at 27 VP (Soldier Strategy), and the rest of the pack were down in the low teens or less. Mervyn had one of the Missionary buildings which helped him out quite a bit as he pulled away during the final round with a strong scoring for colonists. I just didn't have enough soldiers on the map, and in his areas, to contest his control. I believe I attacked at least one person every turn.
4. Arkham Horror (Fantasy Flight Games)
The final group of four of Al Hay, Steve Gallob, Steve's friend (another first timer), and Emily Blanchett tried their hand at Arkham Horror. I believe the group succumbed to the Horrors of Arkham and lost.

Round Two Games
After the Age of Empires game ended we broke up into twos. Greg Blanchett showed Mark Simonitch his playtest game, Fall Blau, he is working on while Mark Woodson and Mark Bausman played EastFront one of their favorites.
 Since Mervyn had only about an hour before he had to leave he and I played the Wizards & Lore Aquitaine, 1369 scenario from Battlelore. Each side had a level 1 Wizard in their war council and the sides forces contained only human units. Mervyn was the attacker, Sir Robert Knolles, and I defended, Sire Bertrand Du Guesclin. Both sides required six flags for the win. This was the first time Mervyn played but he owns Command and Colors: Ancients so was familar with the basic system. Sire Bertrand's forces won 6 flags to 2. After Mervyn left, Mark Simonitch and I played the same scenario this time with Mark taking the forces of Sir Robert Knolles. As with all card driven games especially this one you play where you can. Most of my card draws were in the center followed by the left side. Mark smashed my center while I killed his right flank (my left). The game stayed close with the final score 6 flags to 4 in my favor, but it could have gone the other way if I did not get my last flag in the center as I had two single man units on my left that he could have picked off during his follow up turn, if he had the cards to do so.
After the Arkham Horror game ended, Steve and Al played a game of Blue Moon. I just caught this out of the corner of my eye and don't know much about the game myself.
Monday, August 13, 2007
Shifting Sands - The Italians Rule in East Africa
The previous post begins here.
Turn 1 Axis Action 3 - Invasion of Greece for 3 OPs
In Libya, The 3 Italian Infantry divisions in Sidi Azeiz pull out, moving to El Adem (4th BS), Gazala (2nd Libyan), and Sidi Mufta (1st Libyan) to re-establish their defensive line.
In East Africa, the Italian Africa Divsion and Italian infantry battlegroup, in Jijiga attack the reduced British battlegroup in Berbera, eliminating it, but suffering a loss (1LF) themselves. After their victory, the reduced Italian battlegroup marches into Berbera (1VP) furthing the Axis cause. Also in East Africa, the Italian GDS Division supported by two Italian infantry battlegroups in Keren attack a British infantry battlegroup in Kassala destroying the British battlegroup with no loss to themselves and march victoriously into Kassala.
Turn 1 Allied Action 3 - Minefields for Redeployment (3 RD points)
Fearing the imminent fall of Khartoum (and another loss of 1VP) and the threat of an Egyptian Uprising, the Allies call on their Free French and Polish allies. A Free French and Polish battlegroup are redeployed (from the Allied reserve box) to Khartoum joining the reduced British battlegroup that redeployed to Khartoum from Gallabat first.
Turn 1 Axis Action 4 - Italian Reinforcements #7 for 3OPs
In Libya, the Italian command orders the 2nd BS Division, in Buerat, to Tengeder and the 1st BS Division to Agedabia.
In East Africa, the Italian Africa Division joins the Italian battlegroup in Kismayu preparing for an attack on Nairobi which is lightly defended by a reduced Commonwealth battlegroup. Concurrently, the Italian battlegroup in Gondar is ordered to Gallabat to support the attack on Khartoum.
Turn 1 Allied Action 4 - 1OPs
Wanting to conserve resources (cards) the allies can only move a Commonweath battlegroup to reinforce Nairobi preparing for the attack that is sure to come.
Turn 1 Axis Action 5 - Graziani for Redeployment (2 RD points)
The Italian battlegroup in Ghimbi, E. Africa, redeploys to Gallabat with an Italian Armor battlegroup, from the reserve box, bringing overwhelming force for the upcoming battle for Khartoum.

Turn 1 Allied Action 5 - Taranto Raid for 4OPs
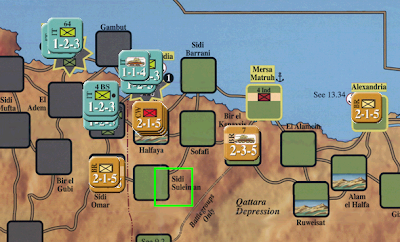
The Allies, hoping their forces in E. Africa are sufficient to hold for at least a little while, concentrate their operations in Libya. The reduced 4th Indian Commonweath Division moves from Sidi Omar to the Southern Flank (via Sidi Azeiz, Sidi Omar, Southern Flank, Bir El Gubi, Southern Flank) protecting against a flanking movement into Egypt by the Italians. The emboldened (Victoria Cross combat card) Allied units in Halfaya (British Infantry and Armor battlegroups and a Commonweath battlegroup) attack Bardia fortress which is defended by the Italian 62nd and 63rd Infantry Divisions and an Italian Armor battlegroup. The Allies win a minor victory forcing the Italians to flee Bardia. The reduced Italian Armor battlegroup retreats to Gambut along with the reduce 63rd Infantry and 62nd Infantry divisions (3LF). Fearing a counter attack the Allies order the reduced Commonweath battlegroup into Bardia while the reduced British infantry and armor battlegroups remain in Halfaya (2LF).
The Axis have one action round left for turn 1. Can the Allies in East Africa hold? Will Bardia fall to an Italian counter attack?
To be continued....
Wednesday, August 8, 2007
Shifting Sands - Brian Mars (Axis), John Boone (Allies): In the Beginning
After my ignominious defeat, as the Allies, in my first game of Shifting Sands with Nevin Ball I decided to give it a go again with Brian Marrs using Cyberboard. In my first game I played defensively as the Allies at the Egyptian-Libyan border waiting for Rommel to appear. This time I decided to be more aggressive from the start.
North Africa Map, at Start

TURN 1
I did not get a reinforcement card on turn 1 but I did draw Matildas. Brian also managed to play Code Book Stolen as his second action leading off with the Italian Africa Division Reinforcement card placing the division in Addis Ababa with the Italian GDS division. Brian had a little bad luck himself drawing all 3 Italian reinforcement cards in his first hand.
Eventhough I did not draw a reinforcement card, I decided I would still be very agressive in North Africa while still covering all VP spaces in Egypt to protect against an Egyptian Uprising.
My first play was "Orders from Rome" as a Redeployment card. I bought a British Armor Battlegroup and Commonwealth Infantry Battlegroup (BG) out of the Reserve box to Halfaya and moved the British Inf BG to Sidi Suleiman from Suez in order to get ready for the Italian push into Egypt.


I had recently read posts on Consim World about the Tripoli or Bust gambit where the Allied player goes OPs heavy in North Africa trying to get to Tripoli (at least El Agheila) early in the game trying for an Auto Victory. Steven Hope on Consim World, post 6367 in the Shifting Sands folder, had outlined a few conditions on when not to try the Tripoli or Bust strategy some of which I list below.
1. Allies do not get a Reinforcement Card on Turn 1.
2. Drawing Matildas and Compass on Turn 1.
Allied Hand Revealed

TURN 1
I did not get a reinforcement card on turn 1 but I did draw Matildas. Brian also managed to play Code Book Stolen as his second action leading off with the Italian Africa Division Reinforcement card placing the division in Addis Ababa with the Italian GDS division. Brian had a little bad luck himself drawing all 3 Italian reinforcement cards in his first hand.
Eventhough I did not draw a reinforcement card, I decided I would still be very agressive in North Africa while still covering all VP spaces in Egypt to protect against an Egyptian Uprising.
My first play was "Orders from Rome" as a Redeployment card. I bought a British Armor Battlegroup and Commonwealth Infantry Battlegroup (BG) out of the Reserve box to Halfaya and moved the British Inf BG to Sidi Suleiman from Suez in order to get ready for the Italian push into Egypt.

Brian's Italians stole the British code book and decided to go on the offensive in East Africa moving the Africa Division to Jijiga, the GDS division to Keren, and an Italian battlegroup to Shasha Manna. My second card was "Naval Shore Bombardment" for 2OPs to move the 4th Indian Division (Mersa Matruh, reduced) and the British BG in Sidi Suleiman to Sidi Omar. Who would pull the trigger first and where?
Opposing Forces Line Up for Battle

Tuesday, August 7, 2007
Introducing Snap Shots from Snap.com
I just installed a nice little tool on this site called Snap Shots that enhances links with visual previews of the destination site, interactive excerpts of Wikipedia articles, MySpace profiles, IMDb profiles and Amazon products, display inline videos, RSS, MP3s, photos, stock charts and more.
Sometimes Snap Shots bring you the information you need, without your having to leave the site, while other times it lets you "look ahead," before deciding if you want to follow a link or not.
Should you decide this is not for you, just click the Options icon in the upper right corner of the Snap Shot and opt-out.
Monday, August 6, 2007
Current Reading Influences Current Game Interest
No gaming this past weekend as we dropped off the kids at the grandparents this Saturday.
After finishing reading Fire in the Sky, covering the World War II air campaigns in the South Pacific, by Eric Bergerud, I've been reading some SciFi. The last two books I read are from the Star Trek universe, original series timeline specifically, Harbinger and Reap the Whirlwind, both by David Mack. Harbinger is the first book in the Vanguard Series and Reap the Whirlwind is the third book. Vanguard is a Watch Tower class Starbase in the unexplored Taurus Reach which lies between the Federation, Klingon, and Tholian Empires.
Continuing with "David" authors, I picked up Echoes of Honor, by David Weber at Half Price books this Sunday. This book is part of the Honorverse and the first one I've started reading and yes, again like the Vanguard Series, I'm jumping out of order. I also found that some of his books are available online here.
The SciFi theme influenced me to pull out the old SPI game Sword and the Stars from the closet and I have been reading the rules. Sword and the Stars exports the older SPI Empires of the Middle Ages (recently re-published by Decision Games) game into Space.
Alan Richbourg's Painted War of the Ring Game
Alan Richbourg sent out some pictures of his newly painted pieces for War of the Ring. With his consent I have posted his pictures below.
Click each image for a larger picture.


 The pieces out of the box are either blue, for the fellowship, or red, for the shadow forces. In the case of the fellowship a frequent complaint is that it is hard to differentiate between the units for Gondor and Rohan and to a lesser extent between Elvish units and Northmen.
Gameday, Saturday, July 28th
Four friends were able to show up for gameday on Saturday.
Mark Bausman
Mervyn Dejecacion
Al Hay
Mark Simonitch
The following games where played.
1. Imperial - 5 players
Starting with control of the following nations
Mark Bausman - Austria-Hungary
John Boone - Italy
Mervyn Dejecacion - Britain and Russia
Al Hay - France
Mark Simonitch - Germany
Imperial is a game about money. The player with the most money, in bonds and cash, at the end of the game wins. Players represent financial investors that influence the running of the major European countries during the late 19th and early 20th century. Although all players start with a majority interest, in terms of bonds, of at least one country at the beginning of the game control can be taken away from the players during the course of the game.
The Map and Setup
The map is divided into both land and sea areas. Each nation is composed of 5 areas called home provinces. Each home province contains a city color coded to indicate which type of factory, armaments (brown)or shipyard (blue), that may be built in that province. There are an additional 15 land regions that do not belong to any of the player nations at game start and also 9 sea regions. Note the difference in terminology, provinces are land areas originally owned by one of the six nations; regions are land or sea areas that are neutral at game start. I will use area when taking about regions and provinces and region or province when being specific. At game start, players are randomly dealt a starting nation flag. Each nation starts with an armaments factory and a shipyard factory to place within their home provinces. On the back of each flag is listed the bonds a player must purchase to start the game with. All players start with a piece of their color in the center space of the circular track on the map called the Rondel and two additional markers in the lowest starting boxes on the Power Points and Tax Charts tables.
A game turn consists of individual player turns starting first with Austria-Hungary and proceeding in order through, Italy, France, Britain, Germany, and finally Russia. While Austria-Hungary starts first, the player on his/her left starts with possesion of the Investor Card. As mentioned earlier a person can lose control of their starting country and in fact have no country under their control and thus effectively no turn while another person may have two, three, or more countries, ie player turns.
As this is a game about money, control is measured by who has the most money invested in a country through the purchase of the countrys bonds. That player will decide, when it is the country's turn, what action that country will take on the Rondel.

The Rondel
At game start, all players start in the center of the Rondel. On the player's first turn they must decided which field to enter and take that as their first action. There after, on subsequent country turns, the controlling player must move the country piece clockwise around the Rondel from 1 to 6 fields and take that action for the country. A player can move the country's piece 1 to 3 fields for free but moving 4 to 6 fields cost $2 Million each. For example, it would cost $6 Million dollars to move 6 fields. There are six different fields on the Rondel representing the six different actions a player may perform in a turn.
The Maneuver field allows the player to move all of the active country's units. There are only two types of maneuver units in Imperial, Armies, and Fleets. Army units moving on land may move to an adjacent land area. Fleets moving from port or from another sea region may move to an adjacent sea region. Army units may also move by sea (convoy) to a land area if all sea regions along the path taken have a fleet of the same nationality of the army unit. During maneuver all fleets of the active nation are moved first, if desired, and then the armies are moved. Because of this orde,r a fleet may first move into a sea region and then an army may use that fleet for a convoy move. If a fleet moves into a sea region, or an army into a land region, that is not occupied by any other player nation the player may place one of his round tax chips in the sea or land region indicating ownership of that region. Players may never place tax chips in others nation's provinces. If a fleet or land unit enters an area occupied by other players units a battle may take place.
Battles are not mandatory. The active player first states if he wishes to battle one of the other players occupying the area. If the active player does not wish to battle the other inactive nations in the same area may choose to battle. If no battle is desired nothing happens and all units remain in the area. If a battle is chosen units of the two battling nations in the area are removed on a one for one exchange rate until no units of one or both sides remain. If only two nations occupied the area at the start of the battle and one nation has at least one unit remaining while the other nation does not at the end of the battle a tax chip, of the winning nation, is placed in the area. Land units that move into another nation's province, that contains a factory, must state whether they wish to deny use of that factory to the owning nation or remain peaceful. If the use of the factory is denied it may not be used for any action that requires the use or presence of a factory. Another nation's factory may be destroyed by three enemy armies occupying the factory province. An army in another nation's province may also deny use of the rail movement ability through that province. Rail movement is a special move that may be used by land units within it own home provinces. Rail movement allows a land unit to move anywhere within its home provinces. This rail move may be used before or after a normal land or convoy move in the same maneuver action.
The Factory field allows the player to build a factory, armaments or shipyard, in the active country for $5 Million. The correct factory must be built, ie brown city provinces may only have an armaments factory and blue city provinces may only have a shipyard factory. A factory provides two benefits. Each factory is worth $2 Million dollars during a Taxation action and factories are used to build armies and fleets during the Production action.
The Production field allows the player to produce one unit in each unoccupied (by an enemy army) factory space of the active nation. There is no monetary cost for this action. Army factories produce army units and naval factories produce naval units.
The Import field is another action that allows build up of a nations units. A maximum of 3 three units (armies or fleets in any combination) may be purchased and placed in the home province of the active nation. It costs $1 Million dollars per unit to perform this action. The purchased units may not be placed in enemy occupied home provinces and fleets are restricted to provinces with blue cities. The last two actions are probably the two most important ones in Imperial, Taxation and Investor.
The Taxation field allows taxing of the active nation to raise money for the nation, pay for its military, increase the country's value, and possibly pay a bonus to the player controlling it. Taxation is a thee step process. First each unoccupied (by enemy units) factory is worth $2 Million dollars and each tax chip is worth $1 Million dollars. The active nations marker is moved to the appropriate space on the Tax Chart. If the marker position moved up on the Tax Chart this difference is awarded to the controlling player, $1 Million dollars per space moved upward from the previous position, as a success bonus for running the country well. Secondly, all military units of the active unit must be paid, if possible, from the tax revenue raised. Each fleet or army costs $1 Million dollars. Any monies left over is added to the treasury of the active nation. Finally, the marker of the active nation on the Power Points track is moved a number of spaces indicated by the current position of the active nation on the Tax Chart. Movement upward on the Power Points track is very important for two reasons. First, the farther along the track a nation is the more it is worth during the end game scoring and two, the game ends immediately when the first nation occupies the 25 point space of the Power Points track. Maximizing the benefits of taxation requires building factories, increasing land and sea holdings, and having a small military at tax time.
The Investor field action consists of the following steps, paying interest to all bond holders of the active nation, activating the investor card, and activating all players who control no nation for investing. All nations who hold bonds from the active nation are paid interest on those bonds from the treasury of the active nation. If there is not enough money in the treasury the controlling player must make up the difference from his own treasury. If this is not possible the Investor action may not be chosen. After paying out interest, the holder of the Investor card is first paid $2 Million dollars from the bank and then may invest in any one nation by either taking a new bond or upgrading an existing bond by paying the difference in cost between the current bond and the new bond. Once the Investor is finish he passes the Investor card to the player on his left. Finally, each player who does not control a country is allowed to invest once. If during the active player's turn he does not land on the Investor field but passes over it he still triggers the ability of the Investor card and the investor ability of players with no control over a country.
The game continues until one country is advanced to the 25 point space of the Power Points track during a Taxation action. When this occurs the game ends immediately and proceeds to the end game scoring procedure.
End Game Scoring
Each player's victory point score is based on the interest value of each bond he holds multiplied by the country's factor on the Power Points track. To this sum is added the player's cash, in millions of dollars, in his personal treasury. The player with the highest total wins.
Our Game
In the beginning, Mark Bausman, starting with control of Austria, expanded his holdings into the region around the Black Sea. Italy moved into Eastern and Central North Africa with France landing in West North Africa. Mervyn, controlling Russia, expanded into Sweden and Denmark. As a first time player one needs to get over the fact that one might not hold a country for the whole game but one still has an affinity for their starting country and as Italy I felt threatened by Austria and France after they blocked me from expanding any further from my two holdings in North Africa. Austria, as my neighbor seemed to be the immediate threat so I built up units to protect against and later attack Austrian holdings near the Black Sea. Mark Bausman later took control of Russia from Mervyn making Italy more nervous but fortunately Mervyn took it back again . Mark Simonitch later took Austria from Mark Bausman leaving Mark Bausman a man without a country. In the end this seemed to work out as a viable strategy for Mark. I accidentally took control of Russia from Mervyn. Accidental in that I only wanted a large bond from Russia since it was so rich and wanted to cash in on its next payout but not really wanting control since Mervyn was handling it well and from my history with Italy I would probably ruin it. Germany temporarily expanded its control into Western Russia but Russia later re-established its border and took back territory Austria had taken in the Black Sea area. At this point, Mark Simonitch then took Russia from me and Mark Bausman and I controlled no countries while Mark Simonitch controlled three, Germany, Russia, and Austria. On my next chance to buy a bond I took back control of Russia. At some point, feeling Italy was cramped from Austria on one side and France on the other, I decided to attack France's holdings in North Africa with the intent to reduce my armies before taxation. On France's next turn with the Investor card Al stopped Italy's aggression by buying control of it. Italy did not do very well for the rest of the game, as if it was doing great before then under my control, as Al spent all his time trying to improve France's position making France very attractive. Mark Bausman spent a good portion of the game with no controlling interest in a country which allowed him to make frequent small bond purchases. Near the end he took control of Russia. Mervyn ended the game when he took control of France and advanced it to end the game. The final point tally is shown below in descending victory point order.
First off I have to say, html tables are a pain in the arse on Blogger. This is the third time I've tried to post these, finally having converted them to PNG files.


2. Age of Empires III: the Age of Discovery - 4 players
Mark Bausman - Score: 63
John Boone - Score: 105
Al Hay - Score: 59
Mark Simonitch - Score: 92
Between Imperial and Age of Empires III, as a first time player of both games, I felt this one was easier to grasp. Each player represents a group in Europe attempting to discover and explore, first the new world, and later other parts of the world not represented on the board. The game consists of three ages with scoring rounds at the end of each age on turns 3, 6, and 8.
Each turn, all players start with 5 colonists, plus any specialist gained from the previous turn, with which to conduct his actions for the turn. In turn order, each player will assign one unit to one of eight tracks/boxes, Initiative, Colonist Dock, Merchant Shipping, Trade Goods, Capital Buildings, Discovery, or Warfare. As you can see there are more choices than you have units so you have to weigh the benefits of performing some actions while foregoing others. The turn rotates through this stage until all units have been placed; you can't save units for the next turn. After all units have been assigned each box it resolved one at a time.
Initiative
There are 5 spaces on the Initiative track numbered in turn order 1 to 5. Players may chose to place a colonist on the lowest numbered unoccupied space on the initiative track to move up in turn order for the next turn. In addition players receive payment equal to the number of the space they occupy ie, space 1 gets to go 1st next turn and receives $1, space two is second and receives $2, etc.
Colonist Dock
The Colonist Dock contains spaces numbered 1 to 11 in addition to two spaces labeled X and Y. Spaces X and Y are in play when activated with the appropriate Capitial Building (Indentured Servitude and Colonization Laws Capital Buildings) along with numbered spaces up to 2 times the number of players minus 1. For example in a 4-player game, 7 numbered spaces would be available for colonists; spaces 8 to 11 are not in play. When the Colonist Dock is resolved the unit on space 1 is moved to any previously discovered colony, then space 2, and so on until all colonists/specialist have landed. There are 9 Colonies in the New World but at the beginning of the game only the Caribbean is open to colonization. All the other areas must first be "discovered" before colonists can be sent to them. Some specialist units have special abilities when they land. A Missionary generates a bonus colonist in the colony it just landed in. A Merchant generates $5 for its owner when it is placed in a colony. A Soldier can be used during the Warfare event in the colony it occupies. As Age I, II and III score for colonies the Colonist Dock is one of the more important Tracks in the game. This track won me the game as I was able to take an early lead during the Age I and II scoring rounds.
Merchant Shipping
The Merchant Shipping event box contains one ship figure which is replaced every turn. When resolved the player who contains the most points of colonists and specialist in this box wins use of the merchant ship for the rest of the game. Both the Captain and Merchant specialist units count as two colonists when placed in this box. Each Merchant ship that a player owns can be used as a "wild card" when building sets of trade goods for money and scoring in the final round. Some Capital Buildings also confer extra rewards per merchant ship owned. The Navy Capital Building awards 4 victory points per ship owned during final scoring and the Privateers Capital Building awards $1 per ship from the other players. In our game Mark Simonitch managed to collect 4 ships along with the Privateers Capital Building allowing him to gain an extra $12 for his piracy actions during the Income phase of the turn.
Trade Goods
At the start of the game and at the beginning of each new turn 4 Trade Goods are randomly drawn and placed near this track. When the Trade Goods event is resolved each player who has a colonist in a Trade Goods box gets to pick one of the available Trade Goods. The order of choice is from leftmost box to right. Building up sets of Trade Goods is one of the ways players generate income in the game to purchase Capital Buildings or train specialists. For any three Trade Goods a player receives $1. For a set of three matching Trade Goods one receives $3 and for a set of 4 matching Trade Goods one receives $6 dollars. As mentioned previously a merchant ship can be used to complete one set; it acts as a wild card. Having leftover money at the end of the game is usually not worth anything unless you also own the Wealth Capital Building which awards 1 victory point for every $5 you have at the end of the game. Other ways to generate income are by sending merchants to colonies via the Colonist Dock as already mentioned, successful discovery events and by purchase and use of some of the Capital Buildings listed below.
Conquest of the Inca Empire - One time gain of $20
Trading Post - $5 per turn Factory - $30 per turn
Privateers - $1 per ship per player
Taxation - $10 per turn
Rum Distillery - $3 per Sugar per turn
Capital Buildings
In every turn, there are 5 randomly drawn, from the pool for the current age, Capital Buildings chits. These are placed face up near the Capital Buildings track. During resolution of the Capital Buildings phase players who have placed a unit in one of the boxes has the opportunity to purchase one of the displayed Capital Buildings. Order is from left to right on the track. First Age buildings cost $10, Second Age cost $14, and Third Age cost $20.
Capital Buildings confer either some special ability, victory points at the end of the game, or money. Examples of special abilities include gaining an extra specialist type per turn, gaining a random trade good per turn, or moving colonists or soldiers between colonies. Which Capital Buildings you purchase can either help your preconceived game strategy or steer you toward one if you are not sure how to proceed.
I had purchased the Training Grounds Capital Building on the first turn which gives the player an extra soldier every turn. I think this let me gain an advantage early when I sent soldiers to colonies early in the First Age.
Discovery
The Discovery box is important as this is the only way new regions can be opened up for colonization. In turn order, players, if they have units in the Discovery Box, can send a group of units, from their units in the Discovery box, to explore one region that has not been "discovered" on the board. At the beginning of the game, the eight undiscovered regions in the new world have a discovery tile placed randomly on them. When a player choses to resolve a discovery in a region the tile is flipped and the number of natives on the tile is compared to the number of units sent on the discovery mission. If the number of natives (ranging from 1 to 5) is greater then the attempt has failed, the tile is returned face down to the region, and the player loses all units sent on that discovery (returned to the players force pool); otherwise it is successful, the player gets to place one colonist in the region, his units sent on the discovery are returned to his force pool, and the player is awarded money. The money awarded is a random base value on the chit and a bonus amount per soldier included in the discovery party. This is another good use for soldiers besides warfare. Soldiers can greatly increase the monetary value of a discovery. The newly discovered region is now open for colonization on the next turn for all players. Once all regions have been discovered on the board new discovery missions are drawn from the discovery card deck. These discoveries are more difficult as the number of natives range from 3 to 6 on the cards. Successful discovery chits/cards award the owning player victory points during the end of game scoring phase.
I had only attempted three discovery missions, all in the new world, during the game which awarded me 15 VPs at the end of the game.
Warfare
Warfare is the last event resolved. There are 4 boxes in the Warfare section of the board. Starting on the leftmost box and working to the right the player in the box can declare either a battle or a war. Battles, which cost no money, allow the player to attack one other player in a region where the player has at least one soldier. Soldiers kill off the enemy player's units on a one for one basis. If the defender also has soldiers in the region he then kills your units. A War costs $10 to declare but allows one player to attack one other player in all regions that both players occupy which contains soldiers of the attacking player. Since Warfare is resolved before scoring it allows a player to improve his scoring position in that region.
Al and I were the only players who started battles during the game and no one spent money to have a war with another player.
Scoring
In turns 3 and 6, players score for Colonies in the New World. A minimum of one player must have at least 3 colonists in a region to score with first place getting 6 points and second place getting 2 points. Ties for first get 2 points and ties for second score zero points. Three ways ties score zero points.
In the final round scoring, after the Third Age, players score for Colonies, Economy, Discoveries, and Capital Buildings. Colonies score as in the 1st and 2nd scoring rounds. Economy scores 1 point for each dollar gained for Trade Goods. Discovery chits/cards score the victory points listed on the chit/card. Capital Buildings score as stated on the respective Capital Building chit. Mark Simonitch came on strong in the the Third Age Scoring Round due to all his Capital Buildings but my First and Second Age score let me hold out for the win.
3. Mag Blast - 3 players
Cody Boone - Glorp
John Boone - Freep
Mark Simonitch - Alpha Mazons
We finished off the day with a game of Mag Blast. I got revenge on Cody from our first playing by taking out his Glorp Empire and then on the next turn took out the Alpha Mazons with a lucky draw of a direct hit card and catastrophic damage cards which Mark could not negate through his open green zone.
Tuesday, July 24, 2007
Sunday, 7/22 - Star Trek: the Adventure Game
Cody and I played an older game from my collection on Sunday afternoon - Star Trek: the Adventure Game from West End Games, 1985.
It is a two player game; pitting the Federation and Klingon Empires against each other as they try to increase their presence and influence within the Treaty Zone established by the Organians. Because the Organians prevented any outright hostilities between the two empires there is no direct military conflict between the two players in the game. Each side explores the planets within the treaty zone and attempt to sway the inhabitants to become members (Federation) or satellites (Klingons) of the respective empires. Each side starts with a Heavy cruiser and three small cruisers with which to explore the treaty zone.
The game went down to the wire with Cody winning by the slimmest of margins with the Victory point marker on the zero space, Federation side up.

Saturday, July 21, 2007
North Texas Wargamers Gameday - July 21
Another meeting of the North Texas Wargamers this Saturday. Brian considered cancelling it as the Dallas Games Marathon was held on the same weekend but there were enough of us who could not attend the marathon long enough to justify the expense so we met for our usual time slot 11-6PM. The following games were played:
Command and Colors: Ancients
Al Hay
Greg Blanchett's daughter Emily
I heard that Al was schooled at least three times by Greg's daughter.
Wings of War: Dawn of War
Al Hay
Emily
Mervyn Dejecacion
Mervyn picked this up today at Game Chest after I bought his copy of Stonewall in the Valley from him. I had almost picked up a copy myself yesterday. Now I can play Mervyn's copy.
Twilight Struggle
Steve Gallob - United States
John Boone - Soviet Union
I had heard good things about it on Consimworld and Boardgamegeek and had considered purchasing it many times but never had. After playing it I can see why it is so popular and has bumped up a notch on my "must buy" list.

The game portrays the post World War II Cold War between the two major superpowers, the Soviet Union and the United States. The game covers the ~45 years of cold war in 10 turns with each turn composed of 6(early years), 7(middle year) or possibly 8 action rounds lead off with a special simultaneous card play round called the Headline phase where each card's event is resolved if possible. After the Headline phase each player, starting with the Soviet, alternates playing cards until all action rounds are complete after which there is a check for possible scoring do to military operations conducted during the turn, then getting ready for the next turn.
 The engine that drives the game, as in all card driven games (CDGs), are the cards and as in most card driven games the players have the choice to either play the card for the Operations Point (OPs) value or the event.
All the events are influenced from the long history of the Cold War and are marked indicating which side can play the card for the event either the Soviet player, the US player or both players. Unlike other card driven games, Twilight Struggle adds a novel twist in that a card that is played by your opponent for the Operations Points whose event belongs to the other player causes the event to also occur with the player who played the card deciding the order the card is resolved either the operations first then the event or vice versa. I believe this is the first time this mechanism has been used in a CDG and adds greatly to the tension in the decision making process. You may have quite a few cards in you hand whose events belong to the other player and having to decide when to play them and in what order they are resolved is sometimes quite exciting to say the least. Fortunately the game adds another novel mechanism whereby you can "dump", not use for OPs or the Event, one or possibly two of these cards - the Space Race Track.

Twilight Struggle abstracts the space race between the two super powers using a track that records the important milestones of space achievement during this time period. In order to advance on the space race track, one plays one of your cards for that round and then rolls the die. If the die falls withing the required range you get to advance, if not, you remain where you are; either way the card is still spent. As you progress up the Space Race track usually the first player to the new level is rewarded either with VPs or some special ability they can use until the opposing player catches up to your level. In our game neither one of us progressed farther than "Lunar Probe".
If one plays a card for Operations Points these points can be spent on one of three activities, placing influence, attempting a coup within a single country, or attempting to realign the government of one or more countries, up to the operations point value. If using the operations points for influence each Operation Point translates to one point of influence in a country (if not controlled by the other player) that can be applied to that country in order to sway it towards your ideology. Each country has a stability rating.

The higher the number the more stable the country is and the harder it is to switch sides once it falls under control of one of the players. The stability rating is the minimum amount of influence one side needs in that country before it controls the country. Both sides can apply influence to the same country and this is what usually happens especially in battleground countries as each side fights to control it. If this is the case then the influence needed to control the country is the stability rating plus the influence applied to the country by the other player. In addition, once a country is controlled the non-controlling side must then spend OPs points on a two OPs for one influence point basis in that country.

Another use for OPs are coup attempts. Only one coup may be attempted per card play. The operations value of the card is used as a die roll modifer to the coup die roll. The die roll plus OPs value is compared to twice the stability rating of the country. If this total is greater then the coup is successful. The difference (die roll + OPs value - 2xStability Rating) is the number of influence removed from the opposing players influence in the country. If there is any of this difference left after removing all of the opposing player's influence the remainder is added to your influence in the country. As you can see, countries with high stability ratings are more difficult to have a successful coup in. If a coup is attempted in a country that is a "battleground" country the coup also affects the level of the DEFCON Track by decreasing it one level closer to Nuclear War. "Battleground" countries are those countries that were historically important during the Cold War period usually because of its strategic location or resources, IE Oil. They are used during scoring rounds to determine who has more control in a region and hence who gets the most victory points for that region during a scoring card play. Coup attempts also increase the value of the Military Track by the Operations Point value of the card used for the coup. Players also score victory points at the end of the turn if one side has failed to accrue military operation points at least equal to the current DEFCON level. For example if the DEFCON level is three and one side has 5 military operation points and the other side has two the other player would effectively net a +1 VP since the other side missed the DEFCON level by one point. The third use of Operations Points are Realignment Rolls. Realignment Rolls are used to reduce enemy Influence in a country. Each Operations Point allows one Realignment Roll in one or more countries. A realignment is less severe than a coup as it allows you, if successful, to only remove the opposing players influence but not add to your own.

A game can end one of four ways, going the full ten turns (winner determined by final score), one side gaining enough victory points at the end of a turn for an automatic victory, one side causing Nuclear War (that side loses), or by play of the Event Card "Wargames" if you satisfy its condition. Victory Points are scored for the various areas when their respective scoring card is played by a player during the action round and at the end of turn 10 when all areas are scored to determine a final victory point score.
As one can surmise the various tracks, influence, coups, realignment attempts, and events all interact in an elegant way making playing the game both a thought provoking and enjoyable experience.
I had never played before so Steve gave me the Soviets. In the game the Soviets have the early advantage but as the game goes on more pro-US cards are introduced into the mix. The cards are divided into an early, mid, and late war deck with mid and late year cards added as the game progresses. The game went the full ten turns with the Soviets coming out on top at (minus) 14 victory points. As each turn is made up of multiple action rounds, I could not possibly remember all of the goings on but some of the memorable moments from the Soviet perspective are included below.
Great Moments in Alternate Soviet Cold War History -
1. Soviets having complete Control of the Middle East during a Middle East scoring round.
2. A successfully played Arab-Israeli War converting a strong (influence 5) US controlled Israel to Soviet control after first converting neighboring Lebanon and Jordan (Egypt was already Soviet) to Soviet control.
3. Having a strong hold on North and South Korea along with Vietnam in Asia.
4. Having and playing "Terrorism" immediately after Steve played "Iranian Hostage Crisis" there by causing him to randomly discard two of his cards instead of one.
5. Being able to play "Aldrich Ames" on Steve as my Headline card of turn 10. This allowed me to view his hand and arrange his cards in the order I wanted him to play them.
As a first time player the board was a little busy for me but it was a very enjoyable game.
Marne 1918: Friedensturm
Paul Borchers
Brian Marrs
This is a new game by the French company Hexasim covering the World War I German offensive in May-August 1918.
A Victory Lost
Mark Simonitch
Greg Blanchett
Covers the Russian offensive Operation Saturn and continues through van Manstein's famous "backhand blow" on the Russian front of World War II.
World War II: Barbarossa to Berlin
Walter McGovern
Sean Harris
European theatre coverage of World War II from the Spring of 1941 to the collapse of Germany's war machine in 1945, if it goes that long.
Subscribe to:
Posts (Atom)